Videos
Bulk email software tutorial videos
Step-by-step Ultra Email walkthroughs with captions, chapters and transcripts. The written steps are in the manual.
Ultra Email: the complete tutorial
Everything from installing Ultra Email to reading your first campaign results, shown step by step in the real app.
Chapters
- 0:00Introduction
- 0:11Install
- 0:30First launch and free trial
- 0:48Activate a licence
- 1:09Add a sender
- 1:54Import contacts
- 2:22Write your message
- 3:01Send your campaign
- 3:28Read the results
- 3:47Extras
- 4:03Where to get help
Download Ultra Email: the complete tutorial captions (.srt)
Read the transcript
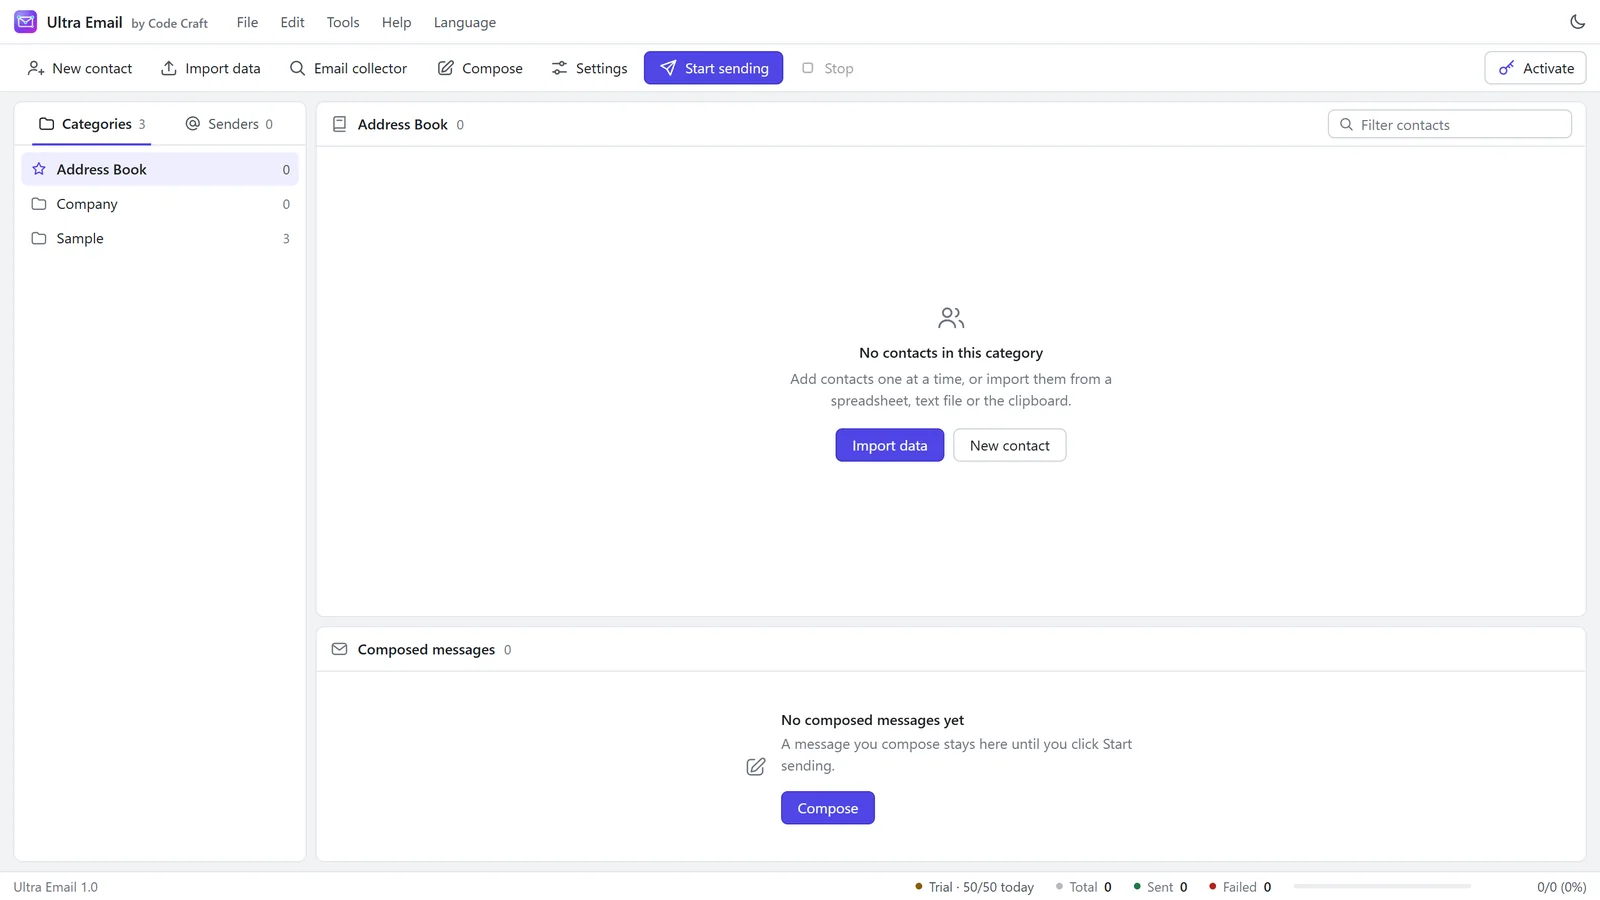
Hi! In this video I'll take you through Ultra Email from start to finish. We'll install it, add a sender, import some contacts, write an email, send it, and check how it did. First, the download. Go to ultraemailer.org and open the download page. You'll see Windows, Mac, Linux, and the Android app. Run the installer, it only takes a moment. And if Windows says it protected your PC, click More info, then Run anyway. That's just because the installer is new. Now open Ultra Email. There's nothing to sign up for. The free trial gives you fifty emails a day, so you can try everything before you buy. I'll click Not now for the moment, and here's the main window. Your contact folders are on the left, your contacts are at the top, and your messages sit underneath. When you buy a plan, your key arrives by email, and it's also on your account page. Click Activate up here, and paste it in. Press Activate, and that's it, the trial limit is gone. Starter, Business and Agency plans differ in how many computers they cover, so see pricing for the one that suits you. I'll stay on the trial for this video. Next, tell the app which email account to send from. Open the Senders tab, then click New sender. This is the picker. There are over a hundred providers here: Gmail, Outlook, business email, and services like Brevo and Amazon SES. You can just search. I'll pick Gmail. Look, you get the exact steps for that provider right here, including the links you need, so you're never guessing. Type your Gmail address and the app password from Google, not your normal password. There's a separate video that covers Gmail in detail. Then add your name, the way people should see it. Send Test Email is a good habit, it checks everything before you rely on it. Once that works, click Add sender, and there it is in your list. Now your contacts. Back on Categories, right-click the list and make a new category. I'll call mine Coffee club. Click Import data. You can use an Excel file, a text or CSV file, or paste from the clipboard. I've copied a list from a spreadsheet, so I'll use Clipboard. Click Continue. The app matches your columns on its own, and it skips duplicates and broken addresses. Anything extra, like the city, becomes a field you can use later. Time to write. Click Compose, and give your email a subject. See those double curly brackets? That's how you drop in each person's first name. You can start from a blank page or from a template. Open Select Template, and pick one. I'll take Newsletter, then make it my own. You get a normal editor up here, with fonts, links and pictures. And if you'd rather paste your own HTML, there's a tab for that too. Before you send, click Check spam score. It reads your message and points out anything that might land you in the junk folder. Fix whatever it flags, close it, and click Add to pending list. Your message now waits here until you're ready. Now the fun part. Make sure your category is selected, and click Start sending. By the way, I'm in simulation mode for this demo, so nothing actually leaves my computer. It asks you to confirm how many people will get it. That's your last chance to change your mind. Click Start sending. And off it goes. You can watch the progress right here, and the totals at the bottom keep counting. If you need to, the Stop button is right up there. Once it's done, this row is your report. Sent tells you how many went out, and Opened tells you how many people read it. A little later, those open numbers keep climbing. Over in the contact list, anyone who unsubscribes gets marked automatically, and they're skipped next time. So your list keeps itself clean. One more thing. The Tools menu has a domain checker, a list cleaner and a spam tester. And that little sun icon up top switches to dark mode, if that's more your style. And that's the whole loop. Add a sender, import your people, write something good, and send. That's it for this one. If you get stuck, email us at contact@ultraemailer.org. The plans and the free trial are all on ultraemailer.org, so see pricing there. Thanks for watching!
Connect Gmail to Ultra Email
How to connect a Gmail or Google Workspace account with an app password, and what Google's sending limits mean.
Chapters
- 0:00Introduction
- 0:08Open the picker
- 0:24Create an app password
- 0:54Fill in the details
- 1:14Test and save
- 1:33Limits worth knowing
- 1:47Where to get help
Download Connect Gmail to Ultra Email captions (.srt)
Read the transcript
Let's connect Gmail. It takes about two minutes, and the one thing to remember is the app password. I'll show you where it goes. In Ultra Email, click the Senders tab, then New sender. The picker opens straight away, and Gmail is right at the top. Click Gmail. If you use Google Workspace with your own domain, pick the Workspace entry instead. The steps are nearly the same. Now read this card, because it's the whole recipe. First, your Google account needs 2-Step Verification turned on. You only ever do that once, and this button takes you straight there. Next, click Create app password. On Google's page, type a name like Ultra Email, and click Create. Google shows you a code, sixteen letters long. Copy that code. And here's the bit people miss: this goes in the app, not your normal Gmail password. Your normal one simply won't work here. Scroll down to the form. The server's already filled in for you, so you only need your address, and that app password. The spaces don't matter, the app takes them out. Send from is the same Gmail address. Sender name is what people see in their inbox, so make it friendly. And Reply-To is handy if you want replies to land somewhere else. Now click Send Test Email, and type an address you can check. If it arrives, you're good. I'm using a made-up account here, so I won't press it. If it fails, the app tells you why in plain English. Nine times out of ten, it's the normal password where the app password should be. All good? Click Add sender. One last thing. Google lets a Gmail account send around five hundred emails a day. So open Settings, and keep your sending limit sensible. If your list is bigger, add more senders, and the app shares the load between them. That's it for this one. If you get stuck, email us at contact@ultraemailer.org. The plans and the free trial are all on ultraemailer.org, so see pricing there. Thanks for watching!
Other email providers and your own SMTP
How to use the sender picker to connect Outlook, your hosting mailbox, services like Brevo and Amazon SES, or any custom SMTP server.
Chapters
- 0:00Introduction
- 0:09The picker
- 0:45Outlook and Microsoft 365
- 0:54Brevo
- 1:13Amazon SES
- 1:26Your own SMTP server
- 1:52Test and rotate
- 2:09Where to get help
Download Other email providers and your own SMTP captions (.srt)
Read the transcript
Not on Gmail? No problem. Ultra Email works with pretty much any email provider, and the picker makes it easy. Let me show you. Go to Senders, then New sender. Up top you can filter by type: personal mailboxes, business email, or sending services. Business email is things like Microsoft 365 and Hostinger. Email services are the bulk senders, such as Brevo, SendGrid and Mailgun. By region helps if your provider's local to you, so China, Korea, India, Europe, and so on are all grouped together. Or just search. You can type a name, a server address, or even a city. Try Frankfurt, and you get the European Amazon SES region. Let's try a few. Search for outlook, and pick it. Same as Gmail, you get the steps for that provider, and the server settings fill themselves in. Now a sending service. Click the picker again, and search for Brevo. These are built for bulk email, so they're a great choice for bigger lists. You sign up with Brevo, create an SMTP key in their dashboard, and paste it where the card says. The username and the password are both from them, not your login. Amazon SES works the same way. Each region is its own entry, so pick the region your account uses. And remember, new SES accounts start in a sandbox until Amazon approves you. And if your provider isn't listed at all? Scroll to Custom. Now you can type the server yourself. You'll find these details in your host's help pages or control panel. Port 587 is the usual one, with SSL off. For port 465, tick Enable SSL. The app changes the port for you, as you can see. Then it's your username, password and from address. As always, send a test first, then click Add sender. You can add as many senders as you like, and the app rotates between them, which helps with those daily limits. And the Setup guide link over here gives you a table of server settings for the common providers, any time you need them. That's it for this one. If you get stuck, email us at contact@ultraemailer.org. The plans and the free trial are all on ultraemailer.org, so see pricing there. Thanks for watching!
The Ultra Email mobile app
A walkthrough of the Ultra Email Android app: connecting an email API service, importing contacts, creating a template and running a campaign.
Chapters
- 0:00Introduction
- 0:07First launch
- 0:33Add a sender
- 1:10Import contacts
- 1:42Create a template
- 1:59Run a campaign
- 2:30Licence and theme
- 2:43Where to get help
Download The Ultra Email mobile app captions (.srt)
Read the transcript
Here's Ultra Email on your phone. It's handy for quick campaigns when you're away from your desk, so let me walk you through it. Install the Android app from the download page, and open it. The first screen asks you to promise you'll only email people who agreed to hear from you. Tick the box, and continue. This is home. It shows your trial allowance at the top, fifty emails a day, and your real numbers underneath. The tabs at the bottom take you to contacts, templates and campaigns. A phone can't really speak SMTP, so the app sends through email services instead. Open Settings, then Senders, and tap to add one. Here's the picker, with plenty of services. Search for yours, or use the chips to filter by type or region. I'll choose Brevo. The steps for Brevo appear, along with a button to get your key. Paste in your API key, add your from address, and tap Save. You can send yourself a test too. I'm on a made-up key, so I'll skip that. Next, your contacts. Open the Contacts tab, and tap the import icon up top. You can choose a CSV file, or just paste your addresses in. I'll paste a few, and tap Use pasted text. Choose a list, or type a name for a new one. You'll also confirm these people opted in. Then import. Now the Templates tab. Tap the plus button, give it a name, a subject, and your message. Tap a tag to drop in somebody's first name. In Campaigns, tap New. Name it, then choose your list, your template, and your sender. Throttle sets how quickly they go out. I'm only showing the steps here, so nothing leaves this phone. Tap Create campaign, and check the summary. You start it from this screen. Keep the app open while it runs, because phones pause background work. You'll see it tick along, and any failures too. Bought a plan? In Settings, tap Activate, and paste your key. See pricing on our website for the options. And while you're in Settings, you can switch to dark mode. That's it for this one. If you get stuck, email us at contact@ultraemailer.org. The plans and the free trial are all on ultraemailer.org, so see pricing there. Thanks for watching!
Ultra Email in one minute
A short overview of what the app does and who it is for.
Download Ultra Email in one minute captions (.srt)
Read the transcript
Ultra Email is bulk email software that runs on your own computer. Your contacts stay on your machine. Emails go out from your own Gmail, Outlook, domain mailbox or Amazon SES, with no fee per email. Import from Excel, CSV or the clipboard. Duplicates and bad addresses are cleaned out. Write rich emails, and personalise every one with merge tags. Add several senders and Ultra Email rotates between them, with step-by-step help for every provider. A spam checker, inbox preview and deliverability tools help you reach the inbox. Send now or schedule for later, follow opens live, and unsubscribes are handled for you. Try Ultra Email free, with fifty emails a day, at ultraemailer.org.
Related guides and pages
Where to go next: guides, setup steps and the pages people read alongside this one.
- Ultra EmailBulk Email Software User Guide in 20 ChaptersInstall, activate, import contacts, connect Gmail and other senders, compose, schedule, track and deliver.Open
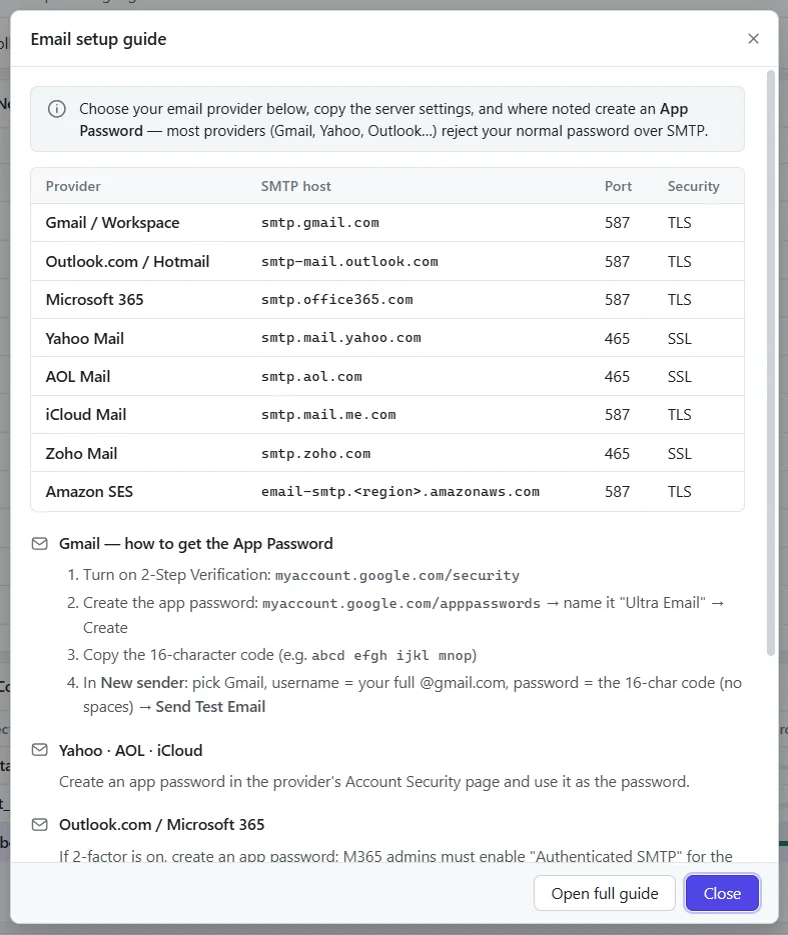
- Ultra Email setupGmail SMTP Settings and Setup for Bulk EmailHost smtp.gmail.com, port 587 with STARTTLS. Where to get the login and how to add Gmail as a sender in Ultra Email, step by step.Open
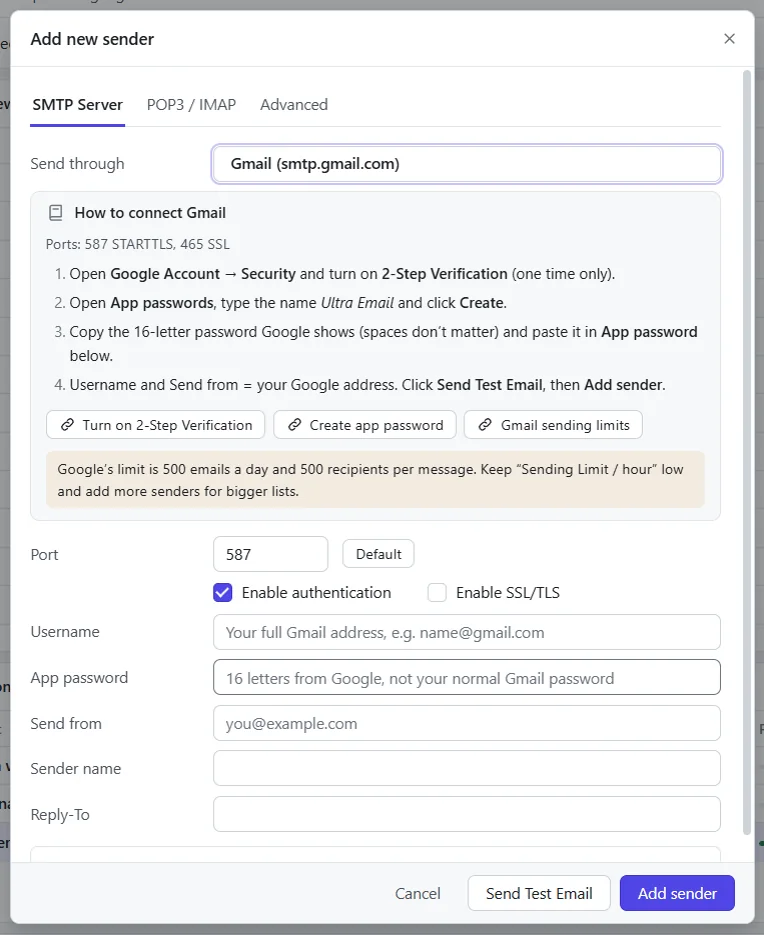
- Ultra Email manualSend Bulk Email from Gmail, Step by StepHow to send bulk email from Gmail or Google Workspace with Ultra Email: turn on 2-Step Verification, create an app password and stay inside daily limits.Open
- Ultra EmailDownload Bulk Email Software, Free TrialDownload bulk email software for Windows or Android. The Ultra Email free version needs no card and sends 50 emails a day.Open